[1-day] CVE-2019-13288(Fuzzing101 Exercise 1_xpdf)
GitHub - antonio-morales/Fuzzing101: An step by step fuzzing tutorial. A GitHub Security Lab initiative
An step by step fuzzing tutorial. A GitHub Security Lab initiative - GitHub - antonio-morales/Fuzzing101: An step by step fuzzing tutorial. A GitHub Security Lab initiative
github.com
사이트 참고.
Fuzzing101의 Exercise 1에 등장하는 CVE-2019-13288 분석. 타겟은 오픈소스인 xpdf이고 퍼저는 AFL++을 사용.
1. 환경 설정
- xpdf 설치
- AFL++ 설치
1-1. xpdf 설치
타겟 프로그램인 xpdf를 설치해준다.
#dependencies 다운로드
sudo apt install build-essential

#xpdf 다운로드
wget https://dl.xpdfreader.com/old/xpdf-3.02.tar.gz
tar -xvzf xpdf-3.02.tar.gz
cd xpdf-3.02
#빌드를 위한 dependencies 다운
sudo apt update && sudo apt install -y build-essential gcc
#컴파일 결과 위치 설정
./configure --prefix="$HOME/fuzzing_xpdf/install/"
#컴파일
make
make install이후에는 샘플 pdf들을 다운 받아준다.
cd $HOME/fuzzing_xpdf
mkdir pdf_examples && cd pdf_examples
wget https://github.com/mozilla/pdf.js-sample-files/raw/master/helloworld.pdf
wget http://www.africau.edu/images/default/sample.pdf
wget https://www.melbpc.org.au/wp-content/uploads/2017/10/small-example-pdf-file.pdf
다운을 다 받았으면, xpdf를 실행시켜 보자.(두번째 꺼는 404 뜨고 없어진듯..?)
$HOME/fuzzing_xpdf/install/bin/pdfinfo -box -meta $HOME/fuzzing_xpdf/pdf_examples/helloworld.pdf핵심은 install/bin 경로에 있는 pdfinfo를 helloworld.pdf라는 인자를 주어 실행한다는 뜻.
이렇게 실행되면 잘 되고 있는 것.
2. AFL++ 설치
AFL++ 다운로드 및 타겟 프로그램을 컴파일 해주어야 하는데, coverage 측정을 위한 instrumentation을 위함이다.
타겟 프로그램 컴파일 초기화
xpdf를 다시금 컴파일 해주어야 한다. 컴파일 결과와 내용을 삭제하자.
#컴파일 결과물 삭제
rm -r $HOME/fuzzing_xpdf/install

#컴파일 내용 삭제
cd $HOME/fuzzing_xpdf/xpdf-3.02/
make clean
AFL++ 설치
아래 명령어를 통해 AFL++을 설치하자.
sudo apt-get update
sudo apt-get install -y build-essential python3-dev automake git flex bison libglib2.0-dev libpixman-1-dev python3-setuptools
sudo apt-get install -y lld-11 llvm-11 llvm-11-dev clang-11 || sudo apt-get install -y lld llvm llvm-dev clang
sudo apt-get install -y gcc-$(gcc --version|head -n1|sed 's/.* //'|sed 's/\..*//')-plugin-dev libstdc++-$(gcc --version|head -n1|sed 's/.* //'|sed 's/\..*//')-dev
#git clone
git clone https://github.com/AFLplusplus/AFLplusplus && cd AFLplusplus
#환경변수설정
export LLVM_CONFIG="llvm-config-11"
#AFL++ 컴파일
make distrib
sudo make installAFL++ 컴파일러(afl-clang-fast)를 이용한 타겟 프로그램 재컴파일
설치하면 이렇게 여러 파일들이 있는데, afl-clang-fast를 사용해 xpdf를 재컴파일 할 것이다.
#afl++ 컴파일러를 이용한 컴파일을 위한 환경설정
export LLVM_CONFIG="llvm-config-11"

#컴파일러 변경
CC=$HOME/AFLplusplus/afl-clang-fast CXX=$HOME/AFLplusplus/afl-clang-fast++ ./configure --prefix="$HOME/fuzzing_xpdf/install/"

#컴파일
cd $HOME/fuzzing_xpdf/xpdf-3.02/

make
make install
여기서 CC = gcc c 컴파일러, CXX = g++ c++컴파일러이다. 위 명령어를 통해 컴파일러를 AFL이 개발한 afl-clang-fast로 변경하겠다는 뜻이다. 이후, ./configure을 통해 xpdf를 재컴파일 해준다.
make
make install
퍼저 실행
이제 퍼저를 실행할 것이다.
afl-fuzz -i $HOME/fuzzing_xpdf/pdf_examples/ -o $HOME/fuzzing_xpdf/out/ -s 123 -- $HOME/fuzzing_xpdf/install/bin/pdftotext @@ $HOME/fuzzing_xpdf/output각 옵션에 대한 간략한 설명:
- i는
- 입력 사례(일명 파일 예제)를 넣어야 하는 디렉터리를 나타냅니다.
- o는
- AFL++가 변형된 파일을 저장할 디렉터리를 나타냅니다.
- s는
- 사용할 정적 무작위 시드를 나타냅니다.
- @@
- 는 AFL이 각 입력 파일 이름으로 대체할 자리 표시자 대상의 명령줄입니다.
따라서 기본적으로 fuzzer는 각각의 다른 입력 파일에 대해 명령을 실행합니다
$HOME/fuzzing_xpdf/install/bin/pdftotext <input-file-name> $HOME/fuzzing_xpdf/output.
에러 떳을 때 대처
If you receive a message like *"Hmm, your system is configured to send core dump notifications to an external utility..."*, just do:
sudo su
echo core >/proc/sys/kernel/core_pattern
exit
퍼저가 실행되고 있는 것을 볼 수 있다.
3. crash 파일 분석
퍼저를 돌리다가 crash가 발견되면 /default/crashes로 가면 이렇게 crash 파일이 있다
crash reproduction
이걸 타겟 프로그램에 넣어보자.
크래시 터진 파일 이름을 보기 쉽게 crash1로 바꾸자.

이 파일을 pdftotext 바이너리의 입력으로 전달해보자.

$HOME/fuzzing_xpdf/install/bin/pdftotext './<your_filename>' $HOME/fuzzing_xpdf/output

이제 gdb로 crash 파일을 제대로 분석해보자. 그 전에 또 불필요한 코드까지 디버깅할 필요가 없기 때문에 타겟 컴파일을 재수행한다.
#기존 컴파일 결과&내용 삭제
rm -r $HOME/fuzzing_xpdf/install
cd $HOME/fuzzing_xpdf/xpdf-3.02/
make clean

#컴파일러 재설정
CFLAGS="-g -O0" CXXFLAGS="-g -O0" ./configure --prefix="$HOME/fuzzing_xpdf/install/"

#컴파일
mak
make install
여기서 CFLAGS CXXFLAGS는 컴파일 시에 최적화 옵션을 주는 기능.
gdb 명령어
gdb --args $HOME/fuzzing_xpdf/install/bin/pdftotext $HOME/fuzzing_xpdf/out/default/crashes/crash1 $HOME/fuzzing_xpdf/output

crash 파일 분석

함수가 무한 반복으로 실행됨. 그 순서대로 파일들을 뒤지며 분석해보면
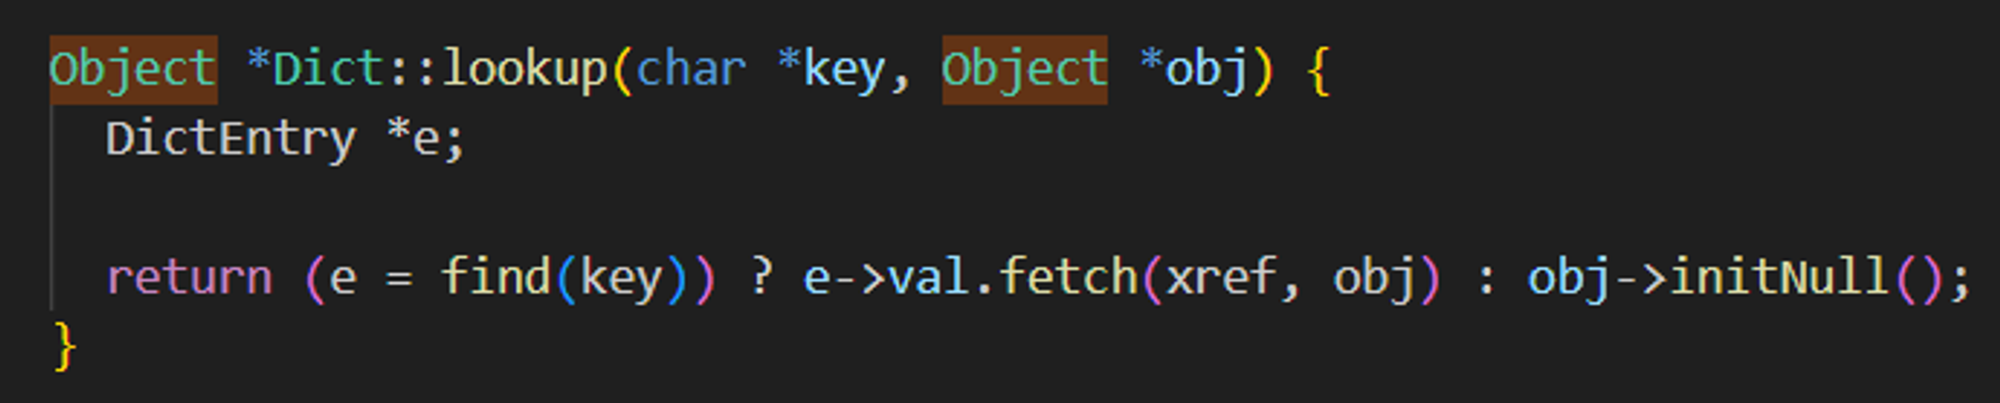
Parser::getObj -> Parser::makeStream -> Object::dictLookup -> Dict::lookup -> Object::fetch -> XRef::fetch -> Parser::getObj 순서.
1. Parser::getObj

2. Parser::makeStream

3. Object::dictLookup

4. Dict::lookup
5. Object::fetch

6. XRef::fetch

꼬리에 꼬리를 물고 Parser::getObj를 호출하는 구조를 확인 할 수 있었다.
Crash 패치
이건 이제 xpdf 최신 버전 패치된 코드를 보면서 추 후에 비교... 해보자